How to Set Up a 24 Volt Solar System | A Complete Guide
A 24 volt solar system uses multiple solar panels wired in series to produce a higher DC voltage output around 24V. This 24V DC electricity is stored in batteries and converted by inverters to power 24V appliances and equipment.
Installing a solar power system can be a confusing process, especially when dealing with higher 24V systems. The key is properly sizing and connecting all the components like panels, batteries, and inverters to produce efficient and reliable off-grid electricity. With a growing interest in clean energy, more homeowners and businesses are looking to set up large 24V solar systems to meet their electricity demands. But where do you start? A complete understanding of the equipment and setup steps is crucial.
In this comprehensive guide we will walk you through everything you need to know to design and install a fully functioning 24-volt solar system. Whether you want to power your homestead or business with solar, read on to learn the basics of assembling an effective 24V solar system from scratch.
What You’ll Need For A 24 Volt Solar System
Setting up a fully functioning 24V solar system requires these key components:
- Solar Panels
- 340-500W polycrystalline or monocrystalline panels in 24V or 48V nominal voltage ratings.
- Number of panels depends on your power needs. Wire in series to reach desired system voltage.
- Charge Controller
- MPPT charge controller rated for your total solar array wattage and 24V nominal battery voltage.
- Ensures batteries are efficiently charged and protected.
- Batteries
- 24V deep cycle lead-acid or lithium-ion batteries, 400-3000Ah capacity.
- Battery bank size determines energy storage. Have at least 200Ah for sufficient reserve.
- Inverter
- Pure sine wave inverter that can output 24V AC from the DC system voltage.
- A power rating of 2500-5000W is common for 24V home solar systems.
- Wiring, Breakers, Racking
- Copper cabling, disconnects, and fuses are rated for the 24V system current.
- Battery terminals, conduit, enclosures, mounting racks.
Setting Up a 24V Solar System
Follow this step-by-step guide for proper installation:
Step 1: Choose an Appropriate Location
Find a south-facing spot for the solar array that receives maximum sunlight throughout the day and year. The site should not be shaded by trees, buildings or other obstructions.
Step 2: Mount the Solar Panels
Securely fasten solar panel racks or frames to the roof or ground. Position for optimal sun alignment. Leave space between panels to prevent shading.
Step 3: Wire the Solar Panels
Option 1: Wire in Series
Wiring the solar panels in series is a crucial step that builds up the system voltage to the desired 24V level.
When panels are connected in series, the positive terminal of one panel is connected to the negative terminal of the next panel. This sums the voltages together while the current remains equal through each panel.
For example, wiring two 12V solar panels in series produces 24V, three 12V panels produce 36V, and so on. 24V panels can also be combined to hit the target system voltage.
Follow these steps to connect solar panels in series:
- Use MC4 branch connector cables or 10-12 AWG copper wire to link the panels. Prepare weather-proof connections.
- Make sure panels are compatible in type, power rating and voltage. Viscount panels together if needed.
- Carefully connect the positive (+) terminal on the back of one panel to the negative (-) terminal on the next.
- Run wiring from the open positive terminal of the first panel to the charge controller positive input.
- Connect the open negative terminal of the last panel in the series to the charge controller negative input.
- Use lightning arrestors and fuses for overcurrent protection as required.
- Measure overall voltage – it should equal the sum of each panel and be around 24V.
Wiring panels in series is vital for building up voltage in an off-grid system. Take precautions for neat, safe connections. Consult a solar specialist if needed.
Option 2: Wire in Parallel
Wiring solar panels in parallel is a common method for connecting multiple panels to increase the overall current output of the solar system. This approach is particularly useful for 24V solar systems, where the parallel connection ensures sufficient current to power various appliances or charge batteries effectively.
Here’s a step-by-step guide on how to wire solar panels in parallel for a 24V solar system:
- Gather the necessary materials including MC4 connectors and the appropriate length of solar PV cables to connect the panels to the charge controller.
- Identify the positive and negative terminals which are typically marked with a red and black wire or symbol.
- Using the MC4 connectors, connect the positive terminals of all solar panels together. This will create a positive busbar, essentially a common positive wire that collects the current from all panels.
- Similarly, connect the negative terminals of all solar panels together, forming a negative busbar. This will ensure that the current from each panel flows through a common negative path.
- Using the appropriate solar PV cables, connect the positive busbar to the positive input terminal of the charge controller. Likewise, connect the negative busbar to the negative input terminal of the charge controller.
- Ensure that all MC4 connectors and cable connections are tightly fastened to prevent accidental disconnections.
- Before turning on the solar system, use a multimeter to verify that the voltage between the positive and negative busbars is 24V. This confirms that the panels are wired correctly in parallel.
- Once the panel connections are verified, connect the battery to the charge controller according to the manufacturer’s instructions. Ensure that the battery voltage matches the system voltage (24V) and that the polarity is correct.
- With all connections secured and verified, turn on the charge controller. The panels will now start generating electricity, and the charge controller will regulate the current to safely charge the battery.
Remember that working with electrical components can be dangerous, so it’s always advisable to consult a qualified electrician or solar installer if you are unsure about any aspect of the wiring process. They can ensure the safety and proper functioning of your 24V solar system.
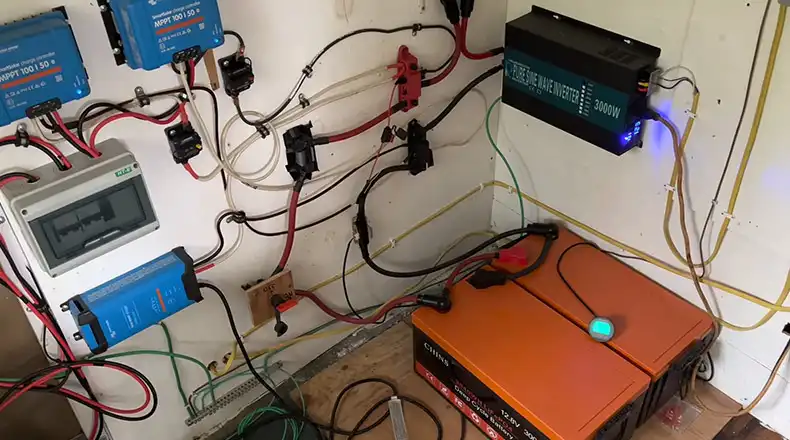
Step 4: Install the Charge Controller
Mount the MPPT controller near the battery bank and connect its input to the solar array output. Ensure voltage specifications match. The controller regulates charging and directs power flow.
Step 5: Connect the Battery Bank
Link together 24V batteries in series and parallel to achieve the required capacity. Connect the battery bank to the charge controller’s output to enable charging.
Step 6: Connect the Inverter
Attach the inverter’s DC input terminals to the charge controller or batteries. This allows conversion of the DC power into standard 120/240V AC current to run household appliances.
Step 7: Connect AC Output to Loads
Connect the AC output side of the inverter to your home or office electrical system with appropriate overcurrent protections in place. Power loads as normal.
Step 8: Add System Monitoring
Install meters, sensors, and automatic controls as desired to monitor system function. This allows remote adjustments.
With correct installation and maintenance, your 24V solar system can provide reliable, renewable energy for decades.
Different Ways to Configure a 24V Solar Setup
There are a few potential arrangements for assembling a 24V solar system:
| Solar Panels | Battery Bank | Equipment |
| 4 x 100W (24V) panels in series | 4 x 100Ah (6V) batteries in series/parallel | 30A charge controller, 3kW inverter |
| 2 x 250W (24V) panels in series | 8 x 200Ah (12V) batteries in series | 60A MPPT controller, 5kW inverter |
| 6 x 330W (48V) panels in series | 16 x 100Ah (12V) batteries in series/parallel | 80A MPPT controller, 10kW inverter |
Customize based on your specific power requirements. Consult an expert to ensure proper sizing and compatibility.
Safety Tips for 24V Solar Systems
Though very reliable, 24V DC power systems do carry electrical risks if not handled properly. Follow these guidelines:
- Work with a Qualified Electrician: Seek assistance from a qualified electrician for complex installations.
- Use Proper Safety Gear: Wear gloves, safety glasses, and protective clothing.
- Disconnect Before Touching Wires: Always disconnect power before handling electrical wires.
- Avoid Overloading Circuits: Ensure wiring and components can handle the system’s load.
- Regular Maintenance: Inspect and maintain the system periodically to ensure optimal performance.
FAQs with Answers
How Many Solar Panels Are Needed For A 24v System?
Most 24V solar systems have 3-8 panels rated for 24V. Panels are wired in series to create a total system voltage around 24V. More panels generate more wattage.
What Voltage Should A Solar Panel Be For A 24v System?
Look for solar panels rated for 24V operation. Individual panel voltage is around 18V, which when wired in series adds up to the nominal 24V system voltage needed. 48V panels can also work if combined properly.
Is A 24v Solar System Better Than 12v?
24V systems are better for larger power capacities given the higher voltage. But 12V systems can be simpler and cheaper for smaller off-grid applications. Choose based on your specific power needs and budget.