Solar Panel Junction Box Replacement | How Do I Change
The reliability of solar panels hinges on the quality of their components, and one often underestimated element that wields a significant impact on performance is the solar panel junction box. Acting as a vital hub, this enclosure is responsible for directing produced current, safeguarding system electronics, detecting faults, and linking strings of panels. When junction boxes fail due to design flaws, material vulnerabilities, or general wear-and-tear, it disrupts the generation of clean power as intended in a PV system.
Homeowners can safeguard their solar investments by familiarizing themselves with warning signs of junction box issues, adopting best practices for replacement, and ensuring proper installation procedures are followed. This knowledge ensures that your solar setup continues to yield maximum returns over time.

What’s a Solar Panel Junction Box?
A solar panel junction box is an electrical enclosure that houses the connections between the solar cells inside the panel and the wires that lead out of the panel. Within the junction box are connectors, terminals, surge protection devices, and sometimes fuses or grounding wiring. The main purpose of a junction box on a solar panel is to safely transition the DC electricity produced by the panel into the cables that carry power to other components of the system.
Junction boxes allow solar installers to link together strings of solar panels, aggregating the power from multiple panels into a combiner box or the main inverter. They contain strain reliefs to protect the wiring from pulling loose or wearing out prematurely from vibration or movement. Reliable, durable junction boxes are crucial to the safe operation and long-term resilience of a solar array.
What Are the Signs of a Faulty Junction Box?
While junction boxes are designed to operate reliably for decades, various issues can cause reduced performance, safety hazards, and even complete system failures. Being able to recognize the signs of a faulty solar junction box is crucial for system maintainers and installers. Some key indications your PV junction box may require replacement include –
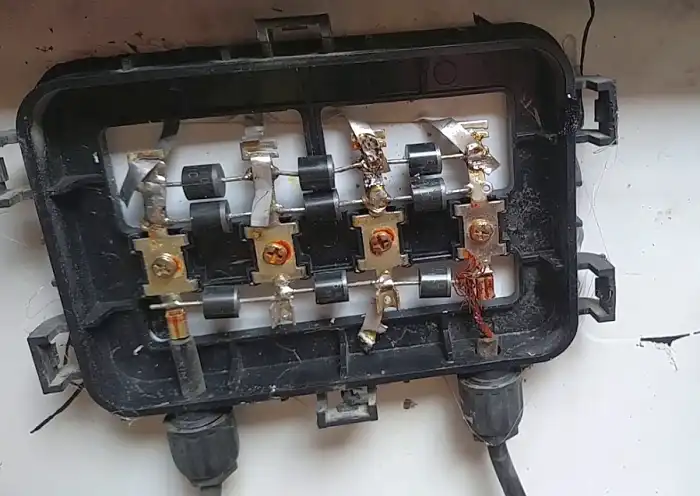
Discolored or burnt terminals: This can indicate overheated connections which can lead to failure over time.
Cracked enclosure: Cracks allow moisture and dirt inside, leading to ground faults and corrosion.
Loose connections: These can increase resistance leading to heat buildup and eventual failure.
Faulty string fusing: This can fail to protect the panel wiring in an overload situation.
Ground faults: Improper grounding can cause leakage current and shock hazards.
If you notice your solar production downtime correlates with environmental factors like rain, snow, or humidity, it may point to a junction box deficiency. It’s best to have a solar professional inspect the panels and junction boxes for signs of wear or damage.
How You Should Choose a Replacement Junction Box?
When solar panel output drops unexpectedly, the culprit may be a degraded junction box no longer routing and regulating power flow properly. Choosing an optimal replacement means thoroughly evaluating key factors based on your existing system.
a) You’ll want to match the junction box style and mounting to your existing system, whether that’s a racking mount box designed to clip onto the panel frame or a string box meant to wire in-line along your string of solar panels.
b) It’s crucial to match the electrical ratings, including voltage and amperage capacity, to your existing panels. Most panels today are designed around 600-1500V DC systems. Underrate the junction box slightly to allow a safety margin.
c) Consider the enclosure material carefully. Plastic boxes won’t corrode over time but metallic boxes offer more durability and protective grounding. Anodized aluminum offers a good balance.
d) Internal wire terminals should match the conductor gauge and be of sufficient number to match your system design. Typically 4-12 terminals accommodate most panel wiring.
e) Integrated strain reliefs or cable glands help protect cable connections from damage. Fasteners must securely close the junction box and seal properly.
f) Getting a junction box with the same number of terminals, wire gauges, voltage rating, and amp capacity as the original will ensure optimal safety and performance. Consult a solar specialist if unsure.
How to Replace a Solar Panel Junction Box Perfectly?
Once you’ve selected an ideal replacement junction box for your solar panel based on mounting style, ratings, wiring, and materials, the next crucial step is safely installing the new enclosure. With care and proper precautions, junction box replacement can restore your solar system functionality. Critical process steps include –
Step 1: Preparation and Module Placement
Place a module with a damaged junction box on a platform to prevent glass scratching and micro cracks. Ensure the platform is clean, tidy, and free of foreign materials. Lay up modules, but be cautious not to pile more than 30 pieces to prevent micro cracks.
Tools and Materials Required Before Replacement –
- A 2-4mm flat blade screwdriver for opening the junction box lid.
- A scraper to clean residual silica gel.
- A measuring cup for mixing potting gel types A and B.
- A pair of gloves.
- A glue gun.
- A temperature-constant electric soldering iron for soldering ribbon.
- Needle nose pliers.
- A multimeter for checking electrical parameters.
- An electronic scale.
Materials Required Before Replacement –
- A new junction box.
- Soldering wire.
- Silica gel.
- Potting gel types A and B.
Step 2: Junction Box Removal
Pry open the defective junction box lid using a screwdriver. Dig out the potting gel to expose the soldering point. Melt the residual tin with an electric soldering iron, lift up the ribbon, and separate it from the junction box. Use a scraper to remove residual silica gel, ensuring no damage to the ribbon.
Lift up the junction box terminal and insert the scraper into the silica gel to loosen it. Pull the cable toward the nearest frame to detach it from the back sheet. Remove any remaining silica gel using the scraper. Use needle nose pliers to make the ribbon perpendicular to the back sheet. Use an electric soldering iron to remove silica gel and tin residue.
Step 3: Junction Box Installation
Place a new junction box in the original position with ribbons through the assembly holes. Check the ribbon’s condition and fine-tune its position if necessary.
Step 4: Welding the New Junction Box
Dispense silica gel onto the backside of the junction box. Pass the ribbon through the assembly hole.
Step 5: Visual Inspection and Electrical Performance Checking
Melt soldering wire with an electric soldering iron and weld the ribbon with a tin joint. Press the ribbon’s end with a flat-blade screwdriver for 1-2 seconds. Perform visual inspection to ensure melting tin fills and wraps the specified region. Test open circuit voltage with a multimeter, comparing it to JA Solar product data sheet specifications.
Step 6: Potting and Curing
Use an electronic scale to measure the weight of potting gel types A and B. Mix them in a measuring cup according to the prescribed ratio. Dispense the potting gel into the junction box, ensuring it reaches the inner edge’s height. Confirm the module is flatwise and wait for silica gel and potting gel to fully cure (at least four hours). Assemble the lid onto the junction box after full curing.
Step 7: Final Inspection
Check the module’s open circuit voltage with a multimeter. Confirm the successful replacement if the parameters are within the specified range.
NOTE: Contact a solar specialist immediately if the replacement junction box shows signs of failure or overheating.
Wrapping It Up
Installing a replacement solar junction box is crucial to restore and maintain a PV system’s safety and energy production. Pay close attention to electrical load specs, enclosure sealing, and wiring when selecting a new reliable waterproof junction box. With proper PPE and isolation procedures, swapping a new box can restore function. But if wiring damage is suspected, consult a solar pro instead of attempting DIY repairs. Take care to match specifications to your existing panels and regularly inspect junction boxes to catch issues early. Maintaining the external connections on your solar investment ensures that clean renewable energy will keep flowing for years to come.
You May Need to Know
What is the difference between a combiner box and a junction box?
A junction box routes power from each solar panel into strings, while a combiner box aggregates multiple solar panel strings together, combines those inputs, and routes the total combined power output to the main inverter or grid connection.
What are the different types of solar junction boxes?
Common solar junction box types include string boxes (in-line wiring), racking mounts (attached directly to the panel frame), array boxes (multiple combined connections), and custom junction boxes for specific panel models.
Do I need a combiner box for 4 solar panels?
With only 4 panels, you may be fine wiring the panels through junction boxes directly into a grid-tied inverter without needing a separate combiner box. Consult your specific inverter manual for solar input channel capacity to confirm.