Charging AGM Batteries with Solar Panels | How to Charge
One of the key components of a solar power system is the battery storage solution, which stores excess energy generated during sunny periods for use during cloudy days or at night. Among the various types of batteries available, Absorbent Glass Mat (AGM) batteries are a common choice due to their maintenance-free design, versatility, and reliability.
But they have different charging methods than traditional lead-acid batteries. So, can you charge AGB batteries with solar panels? The answer is yes, you certainly can. However, there are a few things you should know about before doing so if you want to avoid damaging your batteries.
How to Charge AGM Batteries with Solar Panels?
Here’s a step-by-step guide on how to use your solar panels to charge your solar panels.
1. Check Solar Panel Wattage
First, you need to find the wattage of your solar panels. To do that, look for the W sticker that says 300W or anything similar. If you don’t find any stickers, use a multimeter to measure them yourself.
To do it, get a multimeter and connect red to positive and black to negative terminals. Always use the multimeter on a sunny day. Set the multimeter dial to wattage and note the number. Checking the wattage is crucial to prevent battery damage from overcharging.
2. Measure Solar Panel Amperage
To measure your solar panel amperage, again, test the panel with a multimeter. Check your battery voltage and multiply the solar panel power and battery voltage to measure the amperage.
This helps you choose the right charge controller for efficient charging.
3. Choose the Right Charge Controller
To charge your AGM batteries with solar panels, you also need to choose the right kind of charge controller. There are two types that are available. They are:
- PWM: it’s usually less expensive and it regulates the voltage.
- MPPT: it’s more efficient and stores energy better but costs more.
Choose the right controller based on your solar panel power requirement. Read the user manual if necessary to determine which charge controller you need.
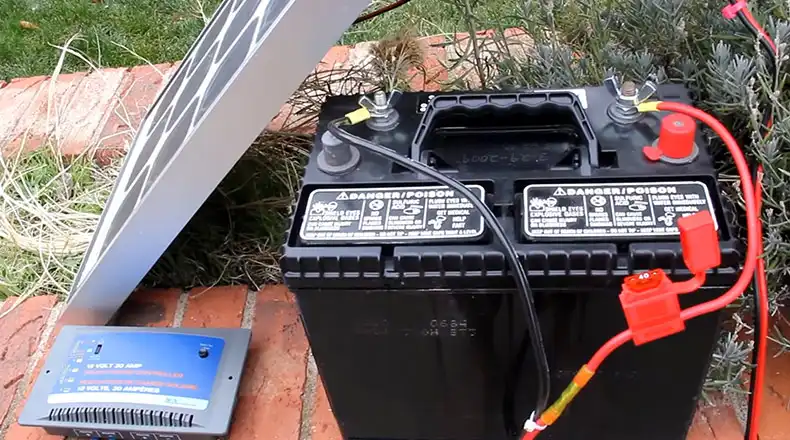
4. Properly Place the Charge Controller
When you have acquired the right kind of solar charge controller, place it properly. Ideally, you should place it in a sheltered spot that has adequate shading. To cover it, use non-conductive materials like PVS, wood, and rubber. Connect the charge controller to the solar panel using wires.
5. Connect Wires to the Battery
Next, you need to connect the wires to the battery. To do it, attach the red wire to the battery’s positive terminal. Twist it around the post securely. Repeat with the black wire on the negative terminal. Use different colored wires to differentiate between positive and negative.
6. Attach Wires to the Charge Controller
To attach the wires to the charge controller, first strip the ends of the wire, use pliers if you need them. Now insert the stripped ends into the corresponding ports on the charge controller. Tighten the screws to secure the wires. To prevent short circuits, use wires suitable for your battery voltage.
7. Use MC4 Connectors
To connect the wires to the charge controller, you need to use an MC4 connector. To do it, insert the wires into the male and female sides of the MC4 connector. Attach the other end of the wires to the charge controller’s “input ports.” Screw the wires securely into place.
8. Connect Controller to Solar Panel
Now connect the charge controller to the solar panel. Use the male port of the MC4 connector. Match it to the correct spot on the solar panel. Insert the port until you hear a slight noise. Repeat with the female port.
If connected correctly, you’ll see voltage and power readings on the charge controller’s screen. If you see “0,” recheck your connections.
9. Monitor Charging
When everything’s done, keep monitoring the AGM battery until it’s fully charged. Charging time may vary with weather conditions and battery size. Check the charge controller’s digital screen for charging information.
That’s it! You’re now successfully charging your AGM battery using a solar panel.
Frequently Asked Questions and Answers – FAQs
How long does it take to charge an AGM battery with solar?
To fully charge a 100-amp hours solar AGM battery that’s 50% discharged, use a 10-amp AGM battery charger for 6 hours or a 20-amp charger for 3 hours.
Is 14 volts too high for an AGM battery?
You should charge AGM batteries with an AGM-specific charger. For deep cycle use, use a current-limited charger at 14.6-14.8V. For standby use, use 13.6-13.8V.
Final Thoughts
Charting your AGM batteries with solar panels is possible, and easy as well. however, it is crucial to maintain proper charging techniques. With proper maintenance and charging, your AGM batteries will last you a very long time. Also, remember not to combine AGM batteries with other types of batteries. It can be potentially dangerous.