How to Make a Solar Panel With CD | Easy Guide
CDs are becoming obsolete, these shiny discs has potential. Here we unveil a captivating journey into creating a solar panel using CDs. Embrace the DIY spirit and generate your electricity with a touch of ingenuity.
Make sure you have lots of disks and then read the article.

Basics of Solar Power
In the quest for sustainable energy solutions, understanding the basics of solar power lays the foundation for harnessing the immense potential of the sun.
This article aims to demystify the key principles that make solar power a viable and eco-friendly option for powering our homes and businesses.
Solar Energy Demystified
Solar power, at its core, is the conversion of sunlight into electricity. This process relies on solar panels, which consist of photovoltaic cells. These cells, commonly made from silicon, have the remarkable ability to convert sunlight into electrical energy through the photovoltaic effect.
The Photovoltaic Effect
Imagine tiny particles of sunlight, known as photons, striking the surface of a solar panel. These photons energize the electrons in the silicon cells, causing them to move. This movement of electrons creates an electric current, generating the power that we can harness for various applications.
Components of a Solar Panel System
Solar panels are the heart of any solar power system. These panels, made up of numerous photovoltaic cells, capture sunlight and initiate the electricity-generating process.
The generated direct current (DC) electricity needs to be converted into alternating current (AC) to be compatible with household appliances. The inverter performs this crucial task.
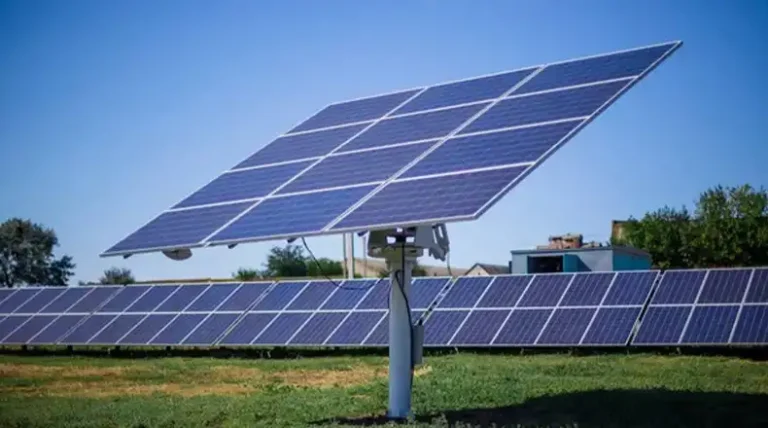
To maximize sunlight exposure, solar panels need to be mounted in a way that captures the most sunlight throughout the day. The mounting structure plays a key role in achieving this.
In some solar power systems, batteries store excess energy generated during sunny days for use during periods of low sunlight, such as at night or on cloudy days.
Benefits of Solar Power
Renewable and Abundant
Solar power relies on an infinite and sustainable resource—the sun. Unlike finite fossil fuels, sunlight is abundant and can be harnessed for generations to come.
Environmentally Friendly
Solar power produces electricity without emitting harmful pollutants, reducing our carbon footprint and contributing to a cleaner, greener environment.
Reduced Electricity Bills
By generating your electricity, you can significantly lower or eliminate your dependence on traditional utility providers, leading to substantial savings over time.
Low Maintenance Costs
Once installed, solar panels require minimal maintenance. Regular cleaning and occasional checks ensure optimal performance and longevity.
Overcoming Common Myths
Myth 1: Solar Panels Don’t Work on Cloudy Days
While solar panels are most efficient in direct sunlight, they can still generate electricity on cloudy days. They continue to capture diffused sunlight, providing a steady but reduced power output.
Myth 2: Solar Power Systems Are Too Expensive
The cost of solar panels has significantly decreased in recent years. Moreover, various incentives and rebates make solar power systems an increasingly affordable and wise investment.
Gathering Needed Materials
When embarking on the exciting journey of creating your own solar panel with CDs, it’s crucial to gather the necessary materials. Each component plays a pivotal role in the success of your eco-friendly project. Let’s explore the essential items you’ll need to bring your DIY solar panel to life.
CD Plates: Unearthing Potential in Obsolete Discs
Begin by securing a collection of CD plates, those shiny relics of a bygone era. As CDs fade into obscurity, their reflective surfaces become a valuable asset for harnessing solar power.
Hunt down spare CDs from your collection, ask friends and neighbors, or explore online and used record stores for a budget-friendly option.
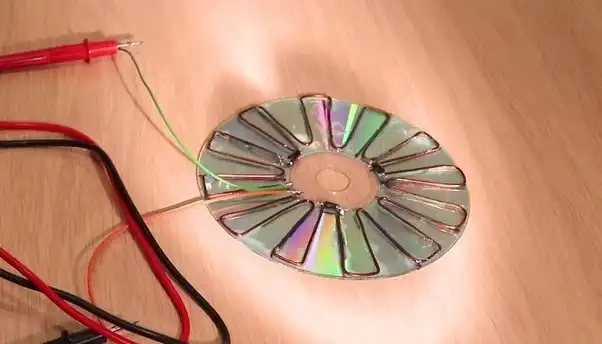
Multimeter: The Precision Tool for Measurement
A multimeter is your trusted companion in ensuring the efficiency of your DIY solar panel. This precision tool measures the voltage, current, and resistance, providing crucial insights during the testing phase. It’s a fundamental component that helps you gauge the success of your solar venture.
Wire Cutters: Crafting Precision Connections
Craftsmanship matters when building a solar panel, and wire cutters are the unsung heroes of precision. These tools allow you to cut and shape wires with accuracy, ensuring a seamless connection between components.
A steady hand and quality wire cutters contribute to the reliability and longevity of your solar panel.
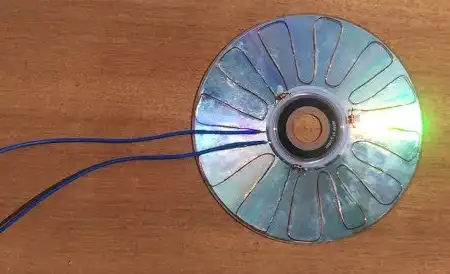
Copper Wire: Weaving the Web of Energy
Copper wire forms the backbone of your solar cell, channeling the captured sunlight into usable electricity.
The process involves carefully attaching the copper wire to the shiny back of the CD, creating a visually appealing pattern that maximizes sunlight absorption. The type and quality of copper wire significantly impact the overall performance of your DIY solar panel.
Super Glue: Bonding for Stability
Super glue becomes the silent architect, bonding components together for stability and durability. Use it to attach the copper wire to the CD and secure other elements in place.
A strong and reliable bond ensures that your solar panel withstands environmental factors, providing a lasting source of sustainable energy.
Insulated Electric Wire: Safeguarding Connections
Safety is paramount when dealing with electrical components. Insulated electric wire acts as a protective barrier, preventing short circuits and ensuring secure connections.
As you connect the copper wire to the Zener diodes and other elements, the insulated electric wire becomes a critical element in the longevity of your DIY solar panel.
Zener Diodes: Regulating Voltage for Efficiency
Zener diodes play a key role in regulating voltage, ensuring a consistent and stable flow of electricity. Glued between the gaps in the copper wire, these diodes enhance the performance of your solar panel.
Their proper placement and soldering contribute to the overall efficiency and reliability of the DIY solar project.
Small Low Voltage Device: Testing the Waters
Before unleashing your DIY solar panel into the sunlight, you’ll need a small low voltage device for testing purposes.
This could be a simple gadget that runs on low power. Connecting your solar panel to this device during testing allows you to gauge its functionality and assess its ability to generate electricity.
Welder: Strengthening Connections
For those opting for a more advanced DIY approach, a welder becomes a valuable tool. It allows you to create strong and enduring connections between components, adding an extra layer of durability to your solar panel.
While not essential for all DIY enthusiasts, a welder is a powerful asset for those seeking a robust and long-lasting solar solution.
Preparing CDs for Solar Use
In the realm of DIY solar panel creation, the process of preparing CDs for solar use is a crucial step that sets the stage for harnessing the sun’s energy. Let’s delve into the intricacies of this essential phase, unlocking the secrets to transform those old, forgotten CDs into reflective powerhouses.
Selecting the Right CDs: The Foundation of Efficiency
The journey begins with the careful selection of CDs, the very building blocks of your solar panel. Opt for CDs with minimal scratches and a shiny surface to ensure optimal reflectivity. Recycling old CDs not only contributes to the eco-friendly aspect of your project but also showcases a resourceful approach.
Cleaning for Maximum Reflectivity
Before diving into the DIY magic, it’s imperative to clean the chosen CDs thoroughly. A clean surface ensures the efficient reflection of sunlight, maximizing the energy absorption of your solar panel.
Simple household cleaning agents and a gentle touch go a long way in preparing the CDs for their new solar role.
Creating a Reflective Surface: A Symphony of Light
Once your CDs are selected and cleaned, the next step involves transforming them into a symphony of reflective surfaces. Consider using a bit of ingenuity in the arrangement, forming a visually appealing pattern that maximizes sunlight capture. This step not only enhances efficiency but adds a touch of creativity to your solar venture.
Recycling Old CDs: A Green Approach
In the spirit of environmental consciousness, repurposing old CDs aligns perfectly with the ethos of DIY solar projects.
Rather than letting them languish in obscurity, these CDs can find a new purpose, contributing to the creation of a sustainable energy source. It’s a small but impactful way to reduce waste and embrace a green lifestyle.
The Role of Super Glue: Ensuring Stability
Super glue takes center stage in this process, acting as the binding force that ensures the stability of your solar panel.
As you affix the copper wire to the CD’s shiny back, creating a structured and secure foundation, the super glue plays a crucial role in making your solar panel a durable and long-lasting creation.
Trying Alternative Designs: A Splash of Creativity
While the conventional method involves a flower-like pattern, don’t shy away from experimenting with alternative designs. This is your chance to infuse a splash of creativity into your DIY solar panel. Explore different cable routings and discover what suits your aesthetic preferences and energy needs best.
Creating the Solar Cell Base
When embarking on the journey of crafting your DIY solar panel, one of the pivotal steps is creating the solar cell base. This phase sets the foundation for harnessing the sun’s energy and converting it into electricity.
Free Energy 100% , How make solar cell from CD flat
Understanding the Importance of a Solid Base
Before diving into the hands-on work, it’s crucial to recognize why the solar cell base holds such significance.
The base serves as the backbone of your solar panel, providing stability and support for the arrangement of CDs. A well-constructed base ensures the longevity and effectiveness of your DIY solar project.
Selecting the Right Material
The material you choose for the solar cell base plays a vital role in the overall performance of your solar panel. Opt for a sturdy and durable material that can withstand various weather conditions. Common choices include plywood, acrylic, or even recycled materials, aligning with the eco-friendly theme of DIY solar projects.
Exploring Different Mounting Options
Once you’ve settled on the material, it’s time to consider the mounting options for your solar cell base. Evaluate factors such as sunlight exposure and the aesthetics of your chosen location.
Whether ground-mounted or wall-mounted, the positioning of your solar panel influences its efficiency. Choose a setup that maximizes sunlight absorption throughout the day.
Arranging CDs for Optimal Reflection
With the base prepared, the next step involves arranging the CDs strategically. The goal is to create a surface that maximizes sunlight reflection onto the solar cells.
Consider experimenting with different patterns to find the arrangement that offers the best reflective properties. This step not only enhances functionality but also adds a touch of creativity to your DIY project.
Securing the Solar Panel in Place
Weatherproofing is a critical aspect of ensuring the longevity of your solar cell base. Apply weather-resistant coatings to protect the base from rain, humidity, and other environmental factors.
Additionally, secure the solar panel firmly in place to prevent any displacement due to wind or external forces. A well-anchored solar panel guarantees consistent performance over time.
Testing the Stability and Reflectivity
Before moving on to the next phase, take a moment to test the stability of your solar cell base. Ensure that it can withstand external forces and remains secure in its designated location.
Simultaneously, evaluate the reflectivity of the CD arrangement under direct sunlight. This testing phase allows you to make any necessary adjustments before connecting the solar panel to the electrical components.
Securing the Solar Panel
In the realm of DIY solar panel creation, the process doesn’t end with the assembly. Securing your solar panel is a critical step that ensures not only its longevity but also its optimal performance over time.
Choosing the Right Mounting Options
Selecting the appropriate mounting option for your DIY solar panel is akin to giving it a reliable foundation.
Whether it’s on your rooftop, in the backyard, or as part of a standalone installation, understanding the dynamics of each location is crucial. Consider factors such as sunlight exposure, accessibility, and aesthetic integration.
The Aesthetics of Solar Integration
When choosing a mounting option, aesthetics matter. A well-integrated solar panel not only contributes to energy efficiency but can enhance the overall visual appeal of your space.
Explore mounting options that seamlessly blend with your surroundings, turning your solar panel into a functional yet stylish addition.
Weatherproofing for Durability
The great outdoors can be harsh, and your solar panel must weather the elements. Weatherproofing is a crucial aspect of securing your solar investment.
Invest in quality materials that shield your panel from rain, wind, and the scorching sun. A durable weatherproofing ensures your solar panel stands the test of time.
Shielding Against the Elements
Imagine your solar panel as a resilient warrior, standing guard against the elements. Proper weatherproofing shields it from rain, preventing water damage, and shields it from intense sunlight, maintaining its efficiency.
A well-protected solar panel is a reliable source of sustainable energy for years to come.
Testing the Sturdiness
Before declaring your solar panel secure, conduct a thorough sturdiness test. Shake, rattle, and roll – well, maybe not that extreme, but ensuring it can withstand mild vibrations and movements is essential.
Confirm that the mounting structure is robust, offering stability even during unexpected events like storms.
Stability for Longevity
A stable solar panel is a durable solar panel. By testing its sturdiness, you’re essentially fortifying its longevity. A well-anchored solar panel not only performs optimally but also reduces the risk of damage, ensuring your investment in green energy pays off over the long haul.
Integration into Your Living Space
Whether it’s a residential rooftop or a backyard installation, the integration of your solar panel into your living space matters.
Explore mounting options that complement the architecture and layout of your property. A seamlessly integrated solar panel becomes a functional part of your daily life, contributing to both energy efficiency and aesthetic harmony.
Green Energy with Style
Securing your solar panel isn’t just about protection; it’s about integrating green energy with style. Consider it as an architectural element that not only generates power but adds a touch of eco-friendly elegance to your space. Embrace the visual appeal of sustainable living.
Testing and Troubleshooting
When it comes to your DIY solar panel project, the journey doesn’t end with its assembly. Testing and troubleshooting are pivotal steps to ensure the functionality and efficiency of your solar creation. Let’s delve into these critical phases to guarantee a smooth and reliable operation.
Testing Your DIY Solar Panel
The first step in the testing process is connecting your solar panel to a multimeter. This simple device becomes your ally in measuring the power output generated by your DIY creation. On a clear day, take your solar panel outside and let it bask in direct sunlight.
Witness the Meter Dance: As the sunlight hits your panel, observe the multimeter reading. A surge in the reading indicates the successful conversion of sunlight into electricity. It’s a moment of accomplishment and validation for your DIY efforts.
Alternative Scenarios: To thoroughly test your solar panel, try placing it in shaded areas or covering it partially. Observe how the meter reacts to changes in sunlight exposure. This experimentation allows you to understand the panel’s performance in various conditions.
Troubleshooting Common Issues
No DIY project is immune to challenges, and your solar panel adventure is no exception. Let’s explore common issues and equip you with the know-how to troubleshoot effectively.
Disconnected Wires: If your multimeter shows no reading or an inconsistent one, check for disconnected wires. Ensure all connections are secure, and use your soldering iron to fix any loose ends.
Zener Diode Glitches: The Zener diodes play a crucial role in regulating voltage. If you notice irregularities in power output, inspect these diodes. Resolder any loose connections and ensure they are correctly placed between the copper wire sections.
Weathering the Storm: Weatherproofing is vital, but sometimes nature takes its toll. If your solar panel is exposed to harsh weather, inspect for water damage or corrosion. Address any issues promptly to prevent long-term damage.
In the Shadows: If your panel isn’t performing as expected, consider its placement. Ensure it’s not overshadowed by nearby structures or objects. Even a small obstruction can significantly impact its efficiency.
Ensuring Long-Term Functionality
Beyond initial testing and troubleshooting, adopting a routine maintenance schedule is key to the long-term success of your DIY solar panel. Regular inspections and care will keep your creation in top-notch condition.
Cleaning Rituals: Dust, dirt, and debris can accumulate on your panel, hindering its ability to harness sunlight. Gently clean the surface with a soft cloth to maintain peak efficiency.
Inspecting the Wiring: Periodically check the wiring for any signs of wear or damage. Secure connections and address any issues promptly to prevent disruptions in power generation.
Upgrading Opportunities: As technology evolves, consider upgrading your DIY solar panel. Explore new materials or techniques that could enhance its performance. Stay informed and adapt your creation for optimal efficiency.
Benefits of DIY Solar Panels
In today’s environmentally conscious landscape, the benefits of embracing do-it-yourself (DIY) solar panels extend far beyond mere cost savings.
This informative article explores the numerous advantages of venturing into the realm of DIY solar projects, shedding light on why individuals are increasingly opting for a hands-on approach to harnessing the power of the sun.
Cost Savings Made Tangible
One of the most compelling reasons to delve into the world of DIY solar panels is the tangible cost savings it offers. Installing a commercially available solar panel system can be a significant investment, often requiring years to recoup the initial expenses.
DIY solar panels, on the other hand, empower individuals to leverage cost-effective materials and components, making solar energy more accessible to a broader audience.
Expert Insight:
By crafting your solar panel, you not only save on installation costs but also gain a deeper understanding of the technology behind it, potentially reducing maintenance expenses in the long run.
Environmental Impact: A Green Revolution at Home
DIY solar panels contribute to a greener planet by promoting sustainable energy practices at the individual level.
By repurposing materials such as old CDs, these projects minimize electronic waste and reduce the demand for new, resource-intensive solar components. Taking a DIY approach becomes a small yet impactful step toward environmental conservation.
Expert Insight:
Every solar panel created at home is a testament to your commitment to reducing carbon footprint and embracing eco-friendly energy alternatives.
Educational Value for All Ages
Engaging in a solar panel DIY project is an enriching educational experience for both young learners and seasoned individuals.
The process of building a solar panel serves as a hands-on lesson in science, technology, engineering, and mathematics (STEM). It fosters curiosity, critical thinking, and a deeper appreciation for renewable energy sources.
Expert Insight:
DIY solar panels transform your home into a practical learning environment, providing a tangible example of how solar energy works.
Independence from Grid Reliance
Beyond the financial and environmental perks, DIY solar panels offer a degree of energy independence. By generating your electricity, you reduce reliance on traditional power grids, particularly beneficial in areas prone to power outages.
This newfound autonomy brings peace of mind and ensures a continuous power supply, especially during unforeseen circumstances.
Expert Insight:
Your DIY solar panel acts as a reliable backup during grid failures, providing a sustainable solution for uninterrupted power.
Customization to Meet Unique Needs
Commercially available solar panels may not always cater to specific energy requirements or spatial constraints. DIY projects, however, offer the flexibility to customize your solar panel system according to your unique needs.
Whether it’s a smaller panel for a science project or a larger installation for supplementary home power, customization is at your fingertips.
Expert Insight:
Tailoring your solar panel to fit your individual needs ensures optimal energy production and utilization.
FAQs
Q1: Can I really build a functional solar panel on my own?
Absolutely! Building a functional solar panel as a DIY project is a rewarding and achievable endeavor. With the right guidance and materials, you can harness the power of the sun for your energy needs.
Q2: What materials do I need for a DIY solar panel?
Key materials include a CD plate, multimeter, wire cutters, copper wire, super glue, insulated electric wire, zener diodes, and a small low voltage device. These items are relatively easy to find and essential for the project.
Q3: Are DIY solar panels cost-effective compared to commercially available options?
Yes, DIY solar panels are cost-effective. By utilizing readily available materials and repurposing items like old CDs, you can significantly reduce the overall cost of your solar panel compared to purchasing a pre-made system.
Q4: How difficult is it to assemble a DIY solar panel?
The difficulty level depends on your familiarity with basic tools and your commitment to following instructions. Many DIY solar panel projects are designed to be user-friendly, with step-by-step guides that make the process accessible even for beginners.
Q5: Can DIY solar panels power my entire home?
While DIY solar panels can generate electricity, they are typically more suited for supplemental power or specific applications. To power an entire home, you might need a larger, professionally installed solar panel system.
Q6: What is the lifespan of a DIY solar panel?
The lifespan of a DIY solar panel depends on factors such as the quality of materials used and environmental conditions. On average, well-maintained DIY solar panels can last 10-20 years or more.
Q7: Do DIY solar panels require a lot of maintenance?
Not necessarily. DIY solar panels are designed for simplicity and durability. Routine cleaning and occasional checks are usually sufficient. Proper maintenance can extend the lifespan of your solar panel.
Q8: Can I connect my DIY solar panel to the grid?
Connecting a DIY solar panel to the grid might require additional components and compliance with local regulations. It’s advisable to consult with a professional or your local utility company for guidance on grid connection.
Q9: What can I power with a DIY solar panel?
DIY solar panels are suitable for powering small electronic devices, lights, fans, or serving as an educational tool. While they may not fully power your home, they offer a sustainable and low-cost energy source for specific applications.
Q10: Is it safe to build and install my DIY solar panel?
Safety is a priority. While DIY solar panel projects are generally safe, it’s crucial to follow safety guidelines, especially when using tools and electrical components. Always take necessary precautions and, if in doubt, seek professional advice.
Conclusion
Summarize the key takeaways from the comprehensive guide on making a solar panel with CDs. Encourage readers to embark on their sustainable energy journey, emphasizing the educational, environmental, and creative aspects of DIY solar projects.

![How Many Solar Panels for 3kVA Inverter? [Answered]](https://www.itekenergy.com/wp-content/uploads/2024/06/How-Many-Solar-Panels-for-3kVA-Inverter-768x428.webp)