Renogy Charge Controller Not Charging Battery
Having issues getting your Renogy charge controller to charge your battery? This frustrating problem can keep your solar power system from operating properly. But don’t worry – with some troubleshooting and testing, you can likely identify the root cause and get your charge controller back to charging your batteries fully again.
In this comprehensive guide, we’ll cover the key reasons a Renogy charge controller may fail to charge, how to diagnose what component is causing the problem, and steps to get your system charging reliably again.
Reasons Why Renogy Charge Controller isn’t Charging Battery
There are a few common issues that can prevent a Renogy charge controller from effectively charging your connected battery bank:
Issue with the Panel
The solar panel is the most critical component of a solar power system, as it is responsible for converting sunlight into electricity. If there is a problem with the solar panel, it can prevent the charge controller from receiving enough power to charge the battery.
There are a few possible reasons why a solar panel might not be working properly:
- Loose wiring connections: Loose wiring connections can prevent the solar panel from generating electricity.
- Soiling or shading: Dirt, debris, or shading can block sunlight from reaching the solar panel, reducing its efficiency..
- Incorrect orientation: Solar panels should be facing true south (in the northern hemisphere) and tilted at the proper angle for maximum sun exposure. If the solar panel is not oriented correctly, it will not generate as much power.
- Panel failure: Solar panels can fail over time due to damage from weather, animals, or other factors. If you suspect that the solar panel is faulty, you can use a multimeter to test its output.
Malfunctioned Charger Controller
The charge controller is responsible for regulating the flow of electricity from the solar panel to the battery. If the charge controller is faulty, it can prevent the battery from being charged. Different voltage values or other related things can ensure whether the controller is damaged or not.
Improper Charging Parameters
The charge controller uses a set of parameters to determine how to charge the battery. If these parameters are set incorrectly, the battery may not be charged properly.
How to Identify Which Component of the Solar System is Causing the Issue?
To zero in on what exactly is causing the lack of charging, there are a few key tests and checks to perform:
Check with the Panel’s Open Circuit Voltage
Using a multimeter, measure the open circuit voltage directly at the solar panel terminals.
- Gather the necessary tools. You will need a multimeter and a clean, dry rag.
- Locate the solar panel’s terminals. These are typically located on the back of the panel, near the junction box.
- Set the multimeter to the DC voltage setting. This setting is usually indicated by a symbol that resembles a lightning bolt with a plus and minus sign on either side.
- Clean the solar panel’s terminals. Use a clean, dry rag to remove any dirt or debris from the terminals. This will ensure a good connection with the multimeter probes.
- Connect the multimeter probes to the solar panel’s terminals. Connect the black probe to the negative terminal and the red probe to the positive terminal.
After that, Compare the measured OCV to the panel’s actual OCV value. The expected OCV value for your solar panel can be found in the manufacturer’s specifications or on the back of the solar panel
If the measured OCV is significantly lower than the expected OCV, it indicates a problem with the panel, wiring, or orientation. However, if the measured value is lying between the panel’s actual operating voltage value and open circuit voltage, then the panel is okay.
Check with the Charger Controller’s Boost Settings for Errors
Renogy charge controllers are equipped with maximum power point tracking (MPPT) technology, which enables them to “boost” solar input to optimal levels. This process ensures that the solar panel is operating at its maximum efficiency and generating the highest possible output of electricity.
To check if there are any errors in the boost settings of your Renogy charge controller, follow these steps:
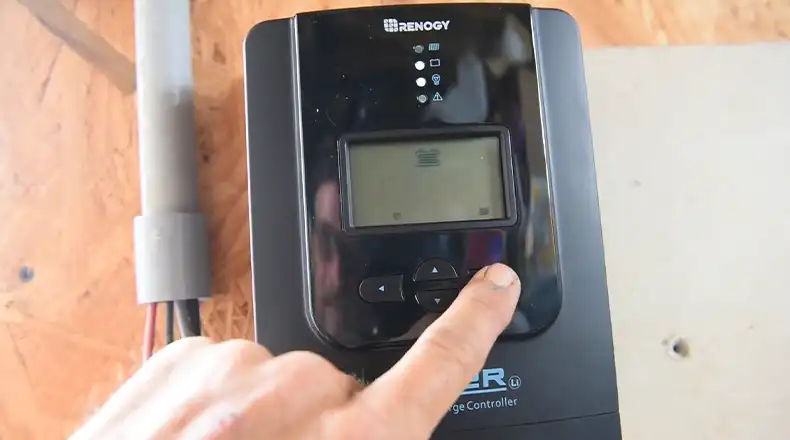
- Access the Controller Settings: Locate the controller’s display or control panel, which is typically mounted on the wall or near the battery bank.
- Navigate to Boost Settings: Depending on the specific controller model, the menu structure may vary. Consult the user manual for your controller to find the specific steps for accessing the boost settings.
- Verify Boost Voltage and Boost Time: Review the boost voltage and boost time settings. The boost voltage is the voltage at which the controller will begin to “boost” the solar input. The boost time is the duration for which the controller maintains the boost voltage.
- Compare Settings to Specifications: Refer to the manufacturer’s specifications for your solar panel and battery bank to determine the recommended boost voltage and boost time settings. Ensure that the controller settings align with the recommended values.
- Check for Error Indications: Some Renogy controllers may display error codes or messages if there are issues with the boost settings. If you notice any error indications, consult the user manual for more information on troubleshooting the specific error.
Check with the Controller’s PV Port Voltage Value and BAT Port Voltage Value
The PV port voltage value is the voltage input from the solar panel, while the BAT port voltage value is the output voltage to the battery. These voltages are crucial for ensuring that the solar panel is generating the correct amount of power and that the battery is being charged properly.
To check the PV port voltage value and BAT port voltage value, follow these steps:
- Locate the PV and BAT Terminals: Identify the PV and BAT terminals on the Renogy charge controller. These terminals are typically labeled and located on the front or side of the controller.
- Connect a Multimeter: Connect a multimeter to the PV and BAT terminals. Set the multimeter to the DC voltage setting.
- Measure PV Port Voltage: Connect the red probe of the multimeter to the positive PV terminal and the black probe to the negative PV terminal. Read the voltage displayed on the multimeter. This is the PV port voltage value.
- Measure BAT Port Voltage: Connect the red probe of the multimeter to the positive BAT terminal and the black probe to the negative BAT terminal. Read the voltage displayed on the multimeter. This is the BAT port voltage value.
Now, compare the PV voltage and BAT port voltage values. If you find that the PV value is more than the BAT port voltage value then the controller is good to go. (the value difference should be at least 2V or more than 2V)
Check with the Controller’s Charging Parameter with the Manual’s Data
Compare the actual absorption, float, and equalization voltages and timers during charging to the recommended settings per the Renogy manual based on your battery type. If deviations, adjust parameters to align with manual specifications.
By methodically checking voltage and settings at each point in the system, you can isolate whether the solar panel, charge controller, or battery bank is the root of the charging problems. Most charge controllers also have indicator lights that can help diagnose faults.
Fixing Renogy Charge Controller Charging Issues
Before going for the solution, it’s important to perform a few initial checks.
If the PV is not recognized, inspect the solar panel wiring for issues and measure the PV input voltage at the controller terminals to see if it meets minimum requirements.
If the battery is not recognized, check the battery wiring and measure the voltage at the controller’s battery terminals to see if the battery is over-discharged below the cut-off threshold.
These initial voltage checks and wiring inspections can identify common problems causing the controller not to charge. More advanced troubleshooting may be needed, but this is a good first step.
If the aforementioned checks failed then here are some steps to get your system charging correctly again:
- Clean solar panels, check orientation and ensure no shading so full power is generated.
- Set the proper battery type, absorption, float, and equalization settings per the product manual.
- Eliminate and replace any defective components like the controller or battery bank as needed.
- Contact Renogy support for additional assistance if problems persist after troubleshooting.
With a bit of diligence and testing, you can troubleshoot why your Renogy charge controller may not be charging properly. In most cases, the problem can be fixed through adjusting settings, updating firmware, replacing defective parts, and ensuring proper setup. Take the time to diagnose the specific issue so you can get your system charging reliably again.
Additional Point – When batteries are in the floating charging phase, the current status on the Charger controller becomes 0. So, if none of the above solutions worked, then check whether the batteries are fully charged or not. You can also use the controller to charge another battery for cross-checking.
Conclusion
Troubleshooting the lack of charging with a Renogy controller may seem complicated, but following some systematic troubleshooting and testing steps can help identify the root cause. The most common issues involve loose connections, improper solar panel setup, defective components, and incorrect charge controller settings. Carefully comparing voltages and charge parameters to manual specifications is key to diagnosing problems. With patience and diligence, you should be able to get your Renogy controller back to reliably charging your batteries. Let us know in the comments if you have any other charging issues with your Renogy controller!