Can Solar Inverter Be Connected to A Sub Panel? Is It Safe?
With climate change pushing more focus on renewable energy, solar power is becoming an increasingly popular option for homes and businesses.
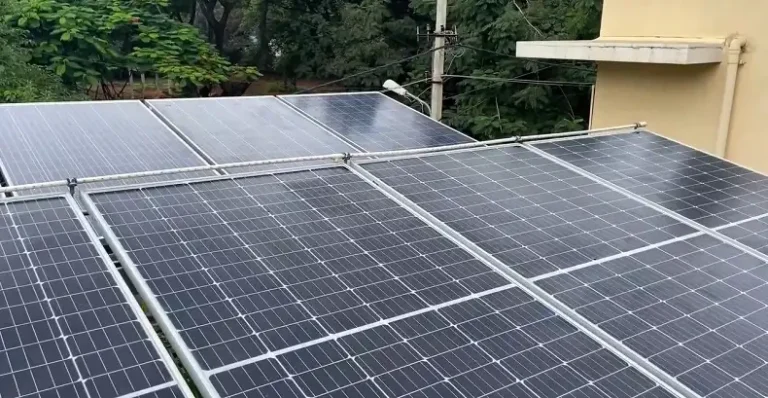
A key component is the solar inverter, which converts the direct current (DC) from solar panels into usable alternating current (AC).
So can a solar inverter be connected to a sub panel to utilize the generated power? Absolutely. By properly integrating the inverter with a home’s electrical sub panel, the solar energy system can supply certain household loads and circuits.This allows leveraging solar power without completely rewiring the electrical system.
With the right inverter sizing and electrical connections, as well as following codes and manufacturer specifications, a solar inverter can safely tie into a sub panel. This makes adopting solar energy more accessible and cost-effective. Understanding the inverter’s role and how to integrate it is key for a successful solar installation.
Sub Panel Explained
A. Purpose of a Sub Panel
A sub panel serves as a secondary breaker box that derives its power from the main electrical panel. Its primary purpose is to distribute power to specific areas or appliances in a building, acting as an intermediary hub for managing electricity within a designated space. By providing additional circuit breakers, it enables the distribution of power to various circuits independently, allowing for a more organized and localized control of electrical systems.
B. Key Components of a Sub Panel
– Circuit breakers in a sub panel serve as safety devices that interrupt the flow of electricity in case of overcurrent or a short circuit. Each circuit breaker corresponds to a specific electrical circuit, preventing overloads and protecting connected devices.
– Bus bars are metal strips or bars inside the sub panel that distribute electrical power to the connected circuit breakers. They act as conductors, efficiently transmitting electricity to various branch circuits without the need for individual wires running directly from the main panel.
– The neutral bar provides a connection point for the neutral wires from the circuits, while the ground bar serves a similar purpose for grounding wires. Separating these bars is essential for maintaining proper grounding and reducing the risk of electrical shock or fire hazards. Grounding ensures that any stray current has a safe path to the ground, enhancing overall electrical safety within the system.
Solar Inverter Basics
A. Function of a Solar Inverter
A solar inverter is an essential component in a solar power system, responsible for converting the direct current (DC) electricity generated by solar panels into alternating current (AC) electricity suitable for use in homes and businesses. Essentially, its primary function is to transform the solar energy captured by the panels into a form that can power household appliances, lighting, and other electrical devices. The inverter optimizes the energy output by ensuring that the electricity produced is in sync with the utility grid’s voltage and frequency, facilitating seamless integration into the existing electrical infrastructure.
B. Types of Solar Inverters
– These are the most common type of inverters and are suitable for smaller solar installations. String inverters connect multiple solar panels in series, forming a “string.” They are cost-effective but are subject to the overall performance of the entire string, so shading or malfunctions in one panel can affect the entire string’s output.
– Microinverters are installed on each individual solar panel, providing more granular control over the system. This design allows for better performance in partially shaded conditions, as each panel operates independently. However, they can be slightly more expensive than string inverters.
– Typically used in larger solar installations, central inverters are responsible for converting the DC electricity from multiple solar panels. They offer high efficiency and are cost-effective for large-scale projects. However, they may be more prone to performance issues in cases of shading or malfunctions affecting multiple panels simultaneously.
Key Factors to Consider for Connecting Inverter to Sub Panel
Utilizing the sun’s power with solar panels is exciting, but before you bask in its glory, ensure your inverter plays nicely with your subpanel. Consider these 4 crucial factors for a seamless connection:
Electrical Load Calculations
To determine the total load on the sub panel:
– Make a list of all electrical devices and appliances connected to the sub panel currently and any you plan to connect in the future.
– For each device/appliance, determine its wattage rating, which should be listed on a nameplate or in the specifications.
– Add up the wattage for all devices and appliances to get the total sub panel load.
You can use this simple formula:
Total Load (Watts) = Device 1 Wattage + Device 2 Wattage + Device 3 Wattage + …
For example:
– Fridge (500 watts)
– Microwave (1000 watts)
– Lights (400 watts)
– TV (300 watts)
– Future electric vehicle charger (3000 watts)
Total load = 500 + 1000 + 400 + 300 + 3000 = 5200 Watts
Once you have the total load on the sub panel, select an inverter that has a power rating at least 25-30% higher than the total load. This provides a safety margin and allows the inverter to operate efficiently.
So for a 5200W total load [Watts / Power Factor = VA (Taking Power factor=0.85 into account)], choose an inverter with at least a 6117 VA-7650 VA power rating. Refer to inverter specifications to select the properly sized model. Oversizing your inverter ensures it can handle the load and future additions.
Sub Panel Circuit Breaker Capacity
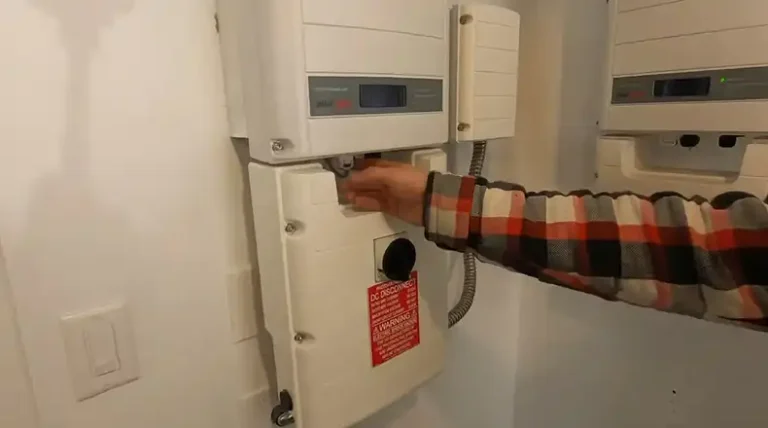
The sub panel must have enough open breaker slot positions to install the breakers required for the inverter connection. Most inverters will require at least two breaker slots-one for the AC output and one for the DC input. If the sub panel does not have sufficient open breaker slots available, the sub panel may need to be replaced or upgraded to a larger capacity panel to accommodate the additional breakers.
The breakers used to connect the inverter to the sub panel must be properly rated for the inverter’s output amperage (AC side) and input amps (DC side). Always refer to the inverter manufacturer’s specifications for appropriate breaker sizing.
Both the AC and DC disconnect breakers for the inverter should be placed adjacent to each other in the sub panel for easy identification and access. Proper sizing of the AC and DC breakers for the inverter connection is critical for safety and efficient operation. Undersized breakers can overload and fail.
Sub Panel Location
The sub panel should be located as close as physically possible to the solar photovoltaic arrays to minimize the distance of the wire runs between the arrays and inverter. Long wire runs will lead to increased voltage drop due to resistance in the wires. Higher voltage drop can reduce system efficiency and performance.
Excessively long DC wire runs from the solar arrays to the inverter should be avoided, as DC wires are more susceptible to voltage drop compared to AC wires. The ideal location is to have the sub panel with the inverter installed either directly beneath the solar arrays or as close as feasible within the building structure.
In some cases, relocating the sub panel closer to the point of interconnection with the solar system may need to be considered if large voltage drops are expected. Proper planning of sub panel location vis-a-vis the solar arrays is critical for optimal and efficient system operation and performance.
Grounding and Overcurrent Protection
Properly grounding the sub panel and inverter is extremely important for safety. This provides a path to safely dissipate hazardous electrical faults and currents. The inverter and sub panel must be bonded to the same grounding electrode system per NEC requirements. This may require adding new ground rods or bonds.
Overcurrent protection in the form of appropriately sized circuit breakers prevents electrical overloads and faults from resulting in risks of fire or shock. Both AC and DC side connections from the inverter should have overcurrent protection per manufacturer specifications and NEC code requirements.
A licensed electrician should ensure suitable grounding and overcurrent protection exists and upgrades are made if needed. Failures can be life-threatening. Proper installation of grounding and overcurrent protection components as required by the NEC is a must for a safe solar inverter and sub panel installation.
Steps for Connecting Inverter to Sub Panel
Connecting a solar inverter to a sub panel allows a home to utilize solar power from PV arrays to run electrical loads connected to the sub panel circuits. Properly integrating the inverter with the home’s electrical system requires careful planning and installation. The major steps include:
Step-01: Choose Proper Inverter Size
Size the inverter to exceed the total wattage of the solar photovoltaic array and all electrical loads that will be powered from the sub panel. This prevents overloading the inverter. As a general rule of thumb, choose an inverter with 20-50% larger capacity than the PV array’s rated wattage to provide a safety margin.
For example, if the total PV array wattage is 5kW, select an inverter rated for 6kVA-7.5kVA or more.
– Refer to the inverter manufacturer’s sizing guidelines as well. Right-sizing the inverter is key for efficiency and performance. Consider future load growth too. Choose an inverter that can handle additional circuits or appliances if added to the sub panel.
Step-02: Install Mounting Location
Mount the inverter as close as possible to the sub panel, within the distance limitations specified by the manufacturer. This facilitates short, clean wire runs. Ensure adequate spacing around the inverter for ventilation and cooling. Follow the manufacturer’s instructions for required clearance spaces around the unit.
Allow sufficient room in front of the inverter for access to wire connections and controls. A minimum of 36 inches is typically recommended. Orient the enclosure so the DC solar array wires enter the bottom, and AC utility wires exit from the top. This aids troubleshooting.
Securely anchor the inverter to the mounting surface per the manufacturer’s guidelines, allowing room for some vibration. Avoid mounting in direct sunlight if indoors, as heat buildup will reduce efficiency and life span.
Step-03: Run Conduit and Wires
Electrical conduit should be installed to run the DC wires from the solar photovoltaic arrays to the input side of the inverter. The conduit protects the wires and provides a clean installation. Similarly, conduit should be used when running the AC output wires from the inverter to the sub panel the inverter will connect to.
The wiring used must be properly rated for the ampacity and voltages of the solar system. Typically 10-12 AWG for the DC wires and 6-8 AWG for the AC side. All wire runs should be kept as short as possible. Follow local electrical codes for sizing wires and conduit.
The conduits, wires, and connections must be properly supported, insulated, and grounded. Use only components approved for the application.
Step-04: Connect to Sub Panel Breaker
The inverter’s AC output wires should connect to an open breaker slot in the sub panel that is rated for the maximum AC output amperage of the inverter. If there are no vacant breaker slots available rated for the inverter output, the sub panel may need a new circuit breaker installed that meets the ampacity requirements. The breaker slot must match the electrical rating and number of poles required for the inverter connection. Follow all manufacturer specifications.
An external AC disconnect switch between the inverter and sub panel may be required by code in some installations for safety. Proper integration of the inverter with the sub panel’s breakers is critical. An electrician should confirm suitable breaker capacity exists.
Step-05: Program and Test System
The inverter needs to be programmed per the manufacturer’s instructions to configure settings such as AC voltage, grid frequency, modes of operation, etc. Testing should be done to confirm the inverter is functioning properly before finalizing the installation.
The installer should verify the correct AC voltage output and frequency to match the utility grid. Any error codes or faults need to be addressed. Troubleshooting may be required. Testing power transfer and shutdown functions ensures the system operates safely as intended.
The inverter software and firmware should be kept updated as per the manufacturer’s recommendations. Proper programming, testing, and configuration is essential to ensure safe, optimal, and reliable functioning of the integrated solar inverter system.
Advantages and Disadvantages of Solar Inverter Be Connected to a Sub Panel
Connecting a solar inverter to a subpanel is generally possible. However, it’s not always the simplest or most ideal option. Understanding the pros and cons is crucial before making a decision.
Advantages:
– Connecting to an existing sub panel can simplify wiring in situations where the subpanel is located closer to the solar panels than the main panel.
– In some cases, using an existing sub panel can avoid the need for additional panel upgrades or installations, potentially saving on costs.
– Connecting to a dedicated sub panel allows for easier monitoring and isolation of solar circuits from other household loads.
Disadvantages:
– Ensure the subpanel is rated for the voltage and amperage output of your inverter. Upgrading an existing sub panel might be necessary.
– Connecting to a subpanel must adhere to specific electrical codes and regulations set by local authorities. Consulting a qualified electrician is essential.
– Backfeeding into the grid from a subpanel requires additional safety measures and equipment like net metering devices and interconnection switches.
Troubleshooting and Maintenance for Solar Inverter and Solar Panel
A. Common Issues with Solar Inverter and Sub Panel Connections
1. Keep an eye out for sudden voltage changes, as they could indicate issues with the inverter or sub panel connections.
2. If breakers consistently trip, it may signify overloading or a fault in the solar inverter or sub panel wiring.
3. Reduced energy production might stem from a faulty inverter or poor connections, impacting overall system efficiency.
B. Regular Maintenance Tips
1. Regularly inspect the solar inverter and sub panel for any signs of physical damage, loose wires, or corrosion.
2. Keep the area around the inverter and sub panel clean to prevent dust or debris buildup, which could affect cooling and performance.
3. Establish a routine for checking system performance, ensuring the solar inverter is operating within specified parameters.
– Regularly check the system’s energy production through monitoring tools provided by the inverter or additional energy management systems.
– Periodically inspect wiring for wear, corrosion, or loose connections. Tighten any loose terminals and replace damaged wiring promptly.
By addressing these common issues and implementing routine maintenance, you can ensure the smooth operation of your solar inverter and sub panel connections, maximizing the efficiency and lifespan of your solar power system.
Your Questions Answered
Q1. Can I connect multiple solar inverters to a single sub panel?
A: Yes, it’s possible. Ensure the sub panel has sufficient load capacity and adhere to local electrical codes for parallel inverter connections.
Q2. What size breaker do I need for the solar inverter in the sub panel?
A: The breaker size depends on the inverter’s output. Follow the inverter manufacturer’s specifications and consider the National Electrical Code (NEC) guidelines.
Q3. Is it necessary to upgrade my sub panel for solar integration?
A: Possibly. Assess the sub panel’s load capacity; upgrading may be needed for larger solar installations. Consult with an electrician for a proper evaluation.
Q4. Can a sub panel improve energy efficiency in my solar power system?
A: Yes, connecting a solar inverter to a sub panel can optimize energy distribution, potentially improving overall system efficiency and performance.
Q5. Are there any specific safety measures for connecting solar inverters to a sub panel?
A: Absolutely. Ensure proper grounding, label all connections clearly, and engage a qualified professional for installation to meet safety standards and local regulations.
Wrapping Up
With careful planning and correct installation, integrating a solar inverter with a sub panel is certainly achievable. This allows homeowners to leverage solar power generated onsite, reducing reliance on the grid. However, complex electrical calculations and safety considerations mean professional consultation is highly advised. Done properly, connecting an inverter to sub panel unlocks the full potential of solar energy in a residential setting.