[Solved] Why Is My Solar Panel Voltage Low
Like any other technology, solar panels can experience hiccups, and one of the most common issues is low voltage output. This can be frustrating, especially when you’ve invested in a premium solar panel system.
Low solar panel voltage can stem from various factors, including shading, dirt or debris accumulation, faulty connections, or even panel degradation over time. The good news is that identifying and addressing the root cause can often resolve the issue and restore your solar panel’s optimal performance.
In this guide, I’ll help you find out the reasons behind low solar panel voltage, explore the best diagnostic techniques, and provide practical solutions to get your solar panel system back on track. Let’s begin!
Possible Reasons Why Solar Panels Provide Low Voltage
As shortly discussed above, there can be several reasons why you might receive low solar voltage. I have mentioned the most common causes of low solar panel voltage so that you can easily identify them and take the necessary steps:
1. Shading and Obstructions
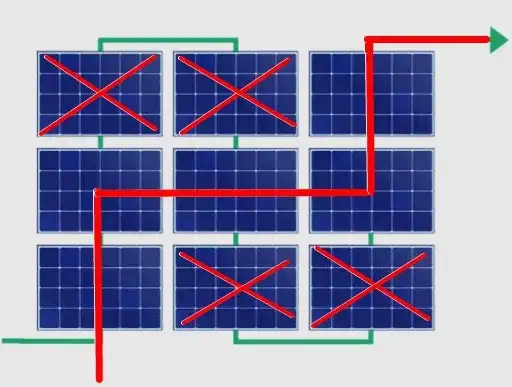
One of the primary reasons for low solar panel voltage is shading or obstructions that block sunlight from reaching the panel’s surface. Even partial shading can significantly reduce the panel’s output voltage, as the shaded cells act as a bottleneck, limiting the overall performance of the entire solar panel.
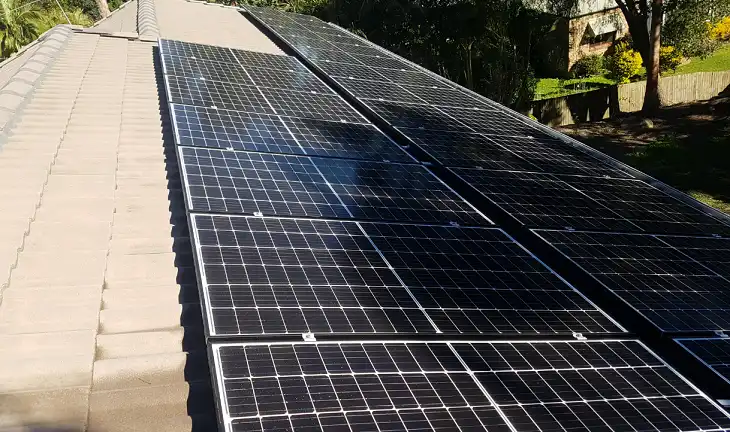
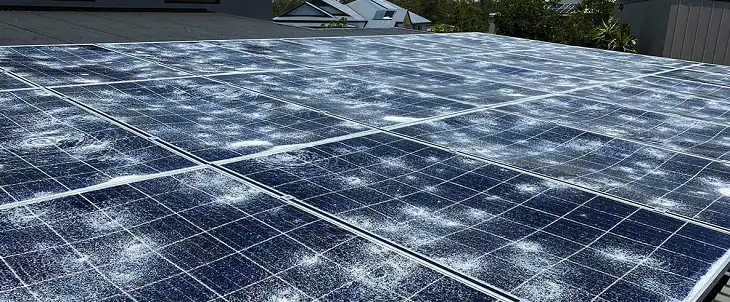
Obstructions can come in various forms, such as nearby trees, and buildings, or even dust and debris accumulation on the panel’s surface. These obstructions cast shadows, preventing sunlight from reaching certain areas of the solar panel and resulting in lower voltage output.
2. Faulty Connections and Wiring
Another common culprit behind low solar panel voltage is faulty connections or wiring issues. Loose or corroded connections can introduce resistance in the electrical circuit, leading to voltage drops and power losses.
Regularly inspecting and maintaining the connections between the solar panels, charge controllers, and batteries is essential to ensure optimal performance. Look for signs of corrosion, frayed wires, or loose terminals, and replace or tighten them as needed.
It’s also crucial to use appropriate gauge wires and follow proper wiring practices to minimize resistance and voltage drops in the system.
3. Panel Degradation and Aging
Over time, solar panels can degrade due to various factors, including exposure to extreme temperatures, humidity, and ultraviolet radiation. This natural aging process can lead to a gradual decrease in the panel’s efficiency and voltage output.
Most reputable solar panel manufacturers provide warranties and specify the expected degradation rate, typically around 0.5% to 1% per year. However, if you notice a more significant voltage drop than expected, it could indicate a manufacturing defect or damage to the panel.
Regularly monitoring your solar panel’s performance and comparing it to the manufacturer’s specifications can help you identify potential degradation issues early on.
4. Inverter and Charge Controller Issues
In a solar panel system, the inverter and charge controller play crucial roles in regulating and converting the electrical output from the solar panels. If either of these components is malfunctioning or improperly configured, it can result in low voltage output.
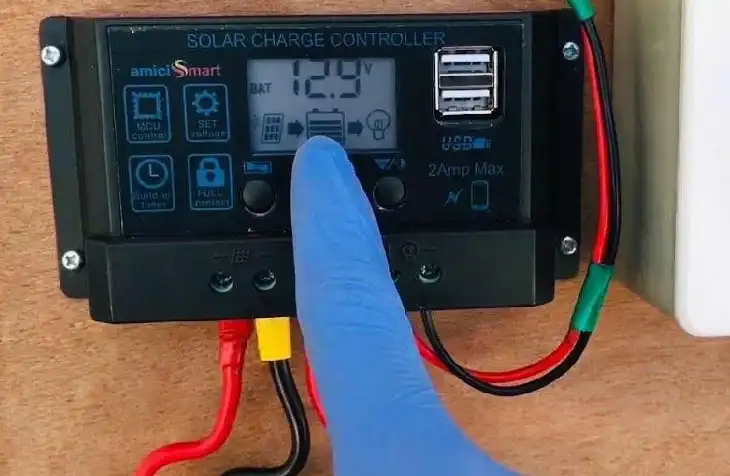
Inverter issues, such as incorrect settings or faulty components, can prevent the solar panels from operating at their optimal voltage range. Similarly, a malfunctioning charge controller may fail to regulate the voltage properly, leading to undercharging or overcharging of the battery bank.
5. Environmental Factors
Environmental factors, such as temperature and weather conditions, can also impact the voltage output of solar panels. High temperatures can reduce the efficiency of solar cells, leading to lower voltage output, while extremely cold temperatures can also affect the performance of the panels and associated components.
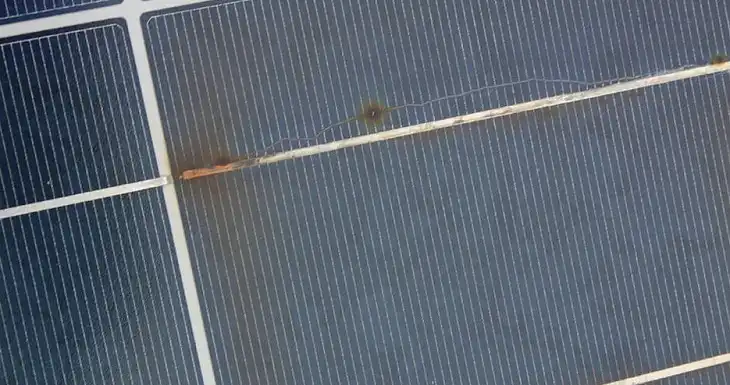
Additionally, severe weather events like hail, strong winds, or heavy snowfall can physically damage the solar panels, causing cracks or delamination, which can further reduce their voltage output.
While environmental factors are largely beyond your control, understanding their impact can help you make informed decisions regarding the placement and maintenance of your solar panel system.
6. Load Mismatches and Oversizing
In some cases, low solar panel voltage can be attributed to a mismatch between the solar panel’s output and the connected load. If the load (e.g., appliances, lights, or devices) is too large for the solar panel system, it can cause the voltage to drop as the system struggles to meet the demand.
Conversely, an oversized solar panel system relative to the connected load can also lead to voltage fluctuations and inefficiencies, as the panels may not operate at their optimal range.
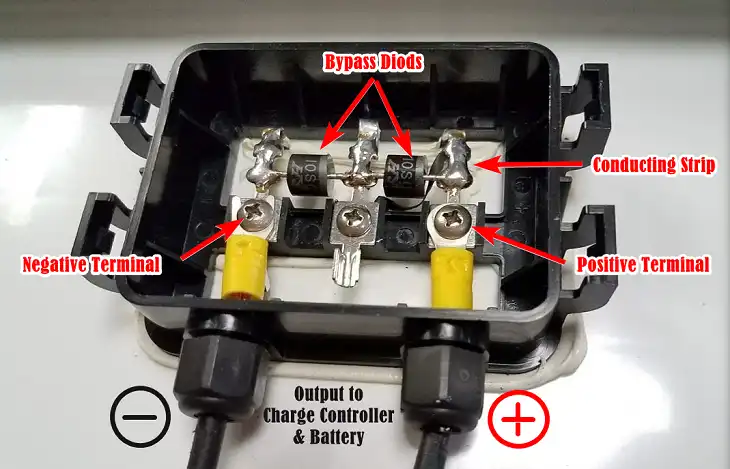
7. Manufacturing Defects
Although rare, manufacturing defects in solar panels can contribute to low voltage output. These defects can include faulty solar cells, poor soldering, or defective bypass diodes, which can lead to underperformance or even complete failure of the affected panels.
If you suspect a manufacturing defect, it’s essential to consult with the panel manufacturer and seek appropriate warranty coverage or replacements. Reputable manufacturers typically provide comprehensive warranties and support for their products.
Diagnosis Steps to Identify the Cause of the Problem
To effectively diagnose and troubleshoot low solar panel voltage issues, follow these steps:
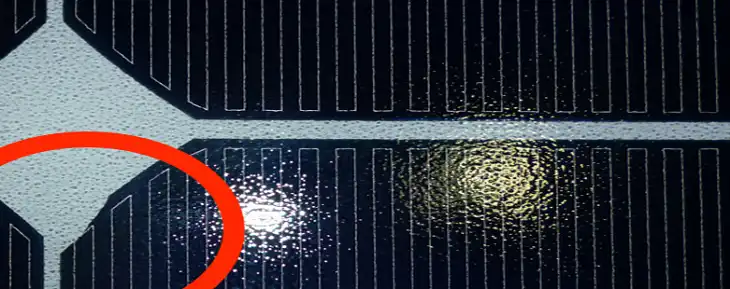
Step 1: Visual Inspection
Start by visually inspecting the solar panels for any obstructions, debris, or physical damage. Check the connections and wiring for signs of corrosion, loose terminals, or frayed cables.
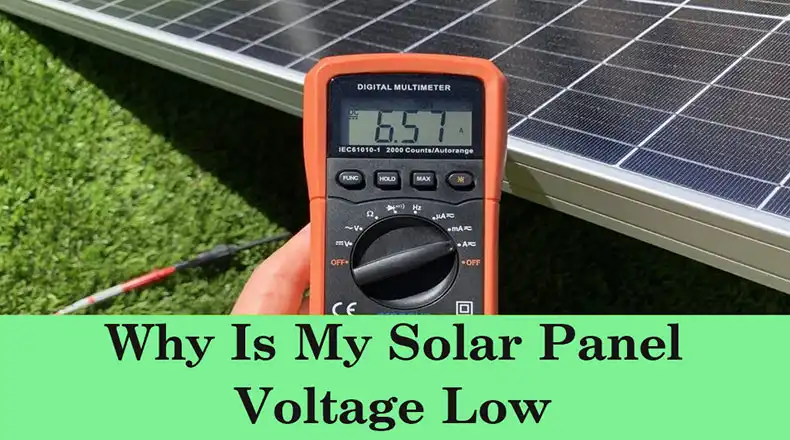
Step 2: Voltage Measurements
To measure voltage:
- Obtain a Reliable Multimeter: Ensure that your multimeter is in good working condition and properly calibrated.
- Disconnect the Solar Panel: Safely disconnect the solar panel from the rest of the photovoltaic (PV) system to measure its voltage independently.
- Set the Multimeter to Measure DC Voltage: Adjust your multimeter settings to measure direct current (DC) voltage, which is the type of electrical output generated by solar panels.
- Ensure Adequate Sunlight Exposure: Position the solar panel in an area where it receives direct and unobstructed sunlight during the measurement process.
- Connect the Multimeter Leads: Connect the negative (black) lead of the multimeter to the negative terminal of the solar panel. Similarly, connect the positive (red) lead to the positive terminal of the panel.
- Observe the Voltage Reading: With the multimeter connected correctly and the solar panel exposed to sunlight, take note of the voltage reading displayed on the multimeter.
- For a standard 12-volt solar panel, the expected open-circuit voltage range is typically between 18 and 28 volts.
- For a typical 24-volt solar panel, the open-circuit voltage range is usually between 36 and 56 volts.
By following these steps, you can accurately measure the voltage output of your solar panel using a multimeter. If the voltage reading falls outside the expected range for your panel’s specifications, it may indicate an issue that requires further investigation and troubleshooting.
Step 3: Shade Analysis
Conduct a shade analysis to identify any potential shading or obstructing objects that may be causing partial shading on the solar panels. Consider using specialized tools or software for accurate shade analysis.
Step 4: Component Testing
Test the inverter, charge controller, and other system components to ensure they are functioning correctly and are not contributing to the low voltage issue.
Step 5: Load Analysis
Evaluate the connected load and ensure that it matches the solar panel system’s capacity. Oversized or undersized loads can lead to voltage fluctuations and inefficiencies.
Step 6: Environmental Monitoring
Monitor environmental factors, such as temperature and weather conditions, to understand their potential impact on your solar panel system’s performance.
If you are unable to identify or resolve the issue, consider seeking professional assistance from a qualified solar technician or installer. They have the expertise and specialized equipment to diagnose and rectify complex issues effectively.
Mitigation Strategies and Solutions to Fix Low Voltage on Solar Panels
Once you’ve identified the cause of low solar panel voltage, you can implement the following solutions and mitigation strategies:
Solution 1: Shading and Obstruction Removal
If shading or obstructions are the culprit, take the following steps:
Step 1: Identify all potential sources of shading, such as trees, buildings, or other structures. Use a shade analysis tool or service to pinpoint the exact areas and times of day when shading occurs.
Step 2: If possible, trim or remove any obstructing objects, such as overhanging branches or shrubs, that are casting shadows on the solar panels.
Step 3: If removing obstructions is not feasible, consider repositioning the solar panels to an area with minimal shading. This may require professional assistance to ensure proper installation and orientation.
Step 4: For larger solar installations, consider investing in solar tracking systems that automatically adjust the panel’s position to follow the sun’s path throughout the day, minimizing the impact of shading.
Step 5: Establish a regular maintenance schedule to keep the solar panels free from dust, debris, or bird droppings that can accumulate and cause shading over time.
Solution 2: Cleaning and Maintenance
Regular cleaning and maintenance are essential to ensure optimal performance. Follow these steps:
- Consult manufacturer guidelines: Refer to the solar panel manufacturer’s recommendations for proper cleaning methods, frequencies, and approved cleaning solutions.
- Use appropriate tools: Invest in soft-bristle brushes, squeegees, and other tools specifically designed for solar panel cleaning to avoid scratching or damaging the panels.
- Avoid harsh chemicals: Stick to mild, non-abrasive cleaners or use plain water to prevent damage to the panel’s surface or coatings.
- Inspect connections and wiring: During maintenance, visually inspect all electrical connections, wires, and cables for signs of corrosion, loose terminals, or frayed wires. Repair or replace any damaged components as needed.
- Consider professional cleaning services: For larger installations or hard-to-reach areas, consider hiring professional solar panel cleaning services equipped with the necessary equipment and expertise.
Solution 3: Wiring and Connection Repairs
If faulty connections or wiring issues are identified, follow these steps:
Step 1: Use a multimeter or other diagnostic tools to pinpoint the exact location of loose connections, corroded terminals, or damaged wiring.
Step 2: Safely disconnect and isolate the affected components from the rest of the system before attempting any repairs.
Step 3: Replace any damaged or corroded wires, terminals, or connectors according to the manufacturer’s guidelines and best practices. Consider using higher-gauge wires or corrosion-resistant materials to improve durability.
Step 4: Ensure that all connections are properly tightened and secured to prevent future issues.
Step 5: After completing the repairs, test the system to verify that the voltage output has been restored to the expected levels.
Solution 4: Panel Replacement
In cases of severe panel degradation or manufacturing defects, consider the following steps:
Step 1: Monitor the performance of individual solar panels over time and compare the data with the manufacturer’s specifications to identify underperforming or defective panels.
Step 2: If a panel is found to be defective or degrading at an accelerated rate, contact the manufacturer to initiate a warranty claim process.
Step 3: Follow the manufacturer’s instructions to obtain replacement panels covered under warranty or purchase new, high-quality panels if the warranty has expired.
Step 4: Engage the services of experienced solar technicians or installers to ensure the proper removal of the old panels and the installation of the replacements.
Step 5: Update your system documentation, schematics, and records to reflect the panel replacements for future reference and maintenance purposes.
Solution 5: Inverter and Charge Controller Maintenance
Proper maintenance of the inverter and charge controller is crucial. Follow these steps:
- Check manufacturer guidelines: Refer to the manufacturer’s recommendations for regular maintenance, firmware updates, and troubleshooting procedures.
- Clean and inspect: Regularly clean the components to remove dust and debris, and visually inspect for any signs of damage or overheating.
- Check settings and configurations: Ensure that the inverter and charge controller settings are correctly configured for your specific solar panel system and local conditions.
- Perform software updates: Install any available firmware or software updates provided by the manufacturer to address known issues or improve performance.
- Consider replacements: If the components are found to be faulty or reaching the end of their expected lifespan, consider replacing them with new, compatible models to maintain optimal system performance.
Solution 6: Load Balancing and Resizing
If load mismatches or oversizing are the issue, take the following steps:
Step 1: Evaluate your energy consumption patterns and calculate the actual load requirements for your household or application.
Step 2: Based on the load analysis, work with a professional solar installer or designer to resize your solar panel system to match your energy needs accurately.
Step 3: Depending on the resizing requirements, you may need to add or remove solar panels from your existing installation to achieve the optimal system size.
Step 4: Ensure that the inverter and charge controller settings are properly configured for the new system size and load requirements.
Step 5: After resizing, closely monitor the system’s performance to ensure that the voltage output and overall efficiency have been optimized.
Solution 7: Environmental Mitigation
While environmental factors are largely beyond your control, you can take steps to mitigate their impact:
- Install ventilation or cooling systems: For high-temperature environments, consider installing adequate ventilation or cooling systems to help maintain optimal operating temperatures for the solar panels and other components.
- Use temperature-resistant components: When replacing or upgrading components, opt for models designed to withstand extreme temperatures or temperature fluctuations.
- Implement shading or protective covers: In areas prone to severe weather conditions, such as hail or heavy snowfall, consider installing protective covers or enclosures to shield the solar panels from physical damage.
- Adjust tilt angles or orientations: In regions with seasonal variations, adjust the tilt angles or orientations of the solar panels to maximize sun exposure during different times of the year.
- Monitor weather forecasts: Stay informed about upcoming weather events and take necessary precautions, such as securing the panels or temporarily shutting down the system, to minimize potential damage.
Solution 8: Reset Reset Your Solar System
Here are steps to reset your solar system:
Step 1- Shut Down the Inverter (If Applicable): If your solar setup includes a large inverter (typically a sizable box), locate the AC/DC toggle switch and turn it off. Skip this step if you have microinverters installed.
Step 2- Turn Off the AC Disconnect: Locate the gray box with a black or red handle, typically situated beside the inverter. Pull the lever to turn off the AC disconnect.
Step 3- Switch Off the Solar Breaker: Go to your main electrical panel and locate the breaker labeled “Solar PV” or something similar. Switch this breaker to the “Off” position.
Step 4- Take a Brief Pause: After following the shutdown sequence, wait for a few minutes, approximately three to four minutes. Use this time to take a short break.
Step 5- Reverse the Shutdown Sequence: Now, you will retrace your steps in reverse order to power on the solar system.
Step 6- Turn On the Solar Breaker: Return to the main electrical panel and switch the “Solar PV” breaker to the “On” position.
Step 7- Turn On the AC Disconnect: Move the lever on the AC disconnect box back to the “On” position.
Step 8- Power Up the Inverter (If Applicable): If your system includes a large inverter, turn it back on using the AC/DC toggle switch. Resetting the system can often clear temporary glitches or communication problems between the various components.
By implementing these detailed solutions and mitigation strategies, you can effectively address low solar panel voltage issues and ensure that your solar panel system operates at its optimal efficiency, maximizing your return on investment and contributing to a more sustainable energy future.
Wrapping Up
Low solar panel voltage can be a frustrating issue, but with proper diagnosis and the right solutions, it can be resolved effectively. By understanding the various factors that contribute to low voltage, conducting thorough inspections, and implementing appropriate mitigation strategies, you can restore your solar panel system’s optimal performance and continue to harness the power of the sun efficiently. Don’t hesitate to seek professional assistance if you encounter persistent or complex issues beyond your expertise.
Thank you for reading this guide. If you have any additional questions or require further assistance, please leave a comment below, and we’ll be happy to help you further.
Frequently Asked Questions (FAQs)
What Is The Ideal Voltage For Solar Panels?
The ideal voltage for solar panels can vary depending on the specific panel model and system configuration. However, most residential solar panels operate within a range of 30 to 40 volts under standard test conditions.
Can Low Solar Panel Voltage Damage My System?
If left unaddressed, low solar panel voltage can potentially cause damage to your system components, such as the charge controller or inverter. It’s essential to identify and resolve the issue promptly to prevent further degradation or failure.
How Often Should I Check My Solar Panel Voltage?
It’s recommended to check your solar panel voltage at least once a month or after any significant weather event or system change. Regular monitoring can help identify potential issues early and allow for timely corrective actions.
Can Solar Panel Voltage Be Too High?
Yes, excessively high solar panel voltage can also be detrimental to your system. High voltage can occur due to factors like low temperatures or voltage spikes, and it can damage components if not properly regulated or mitigated.
Is Low Solar Panel Voltage A Common Issue?
Low solar panel voltage is a relatively common issue that many solar system owners may encounter at some point. However, with proper maintenance, monitoring, and troubleshooting, it can often be resolved effectively.
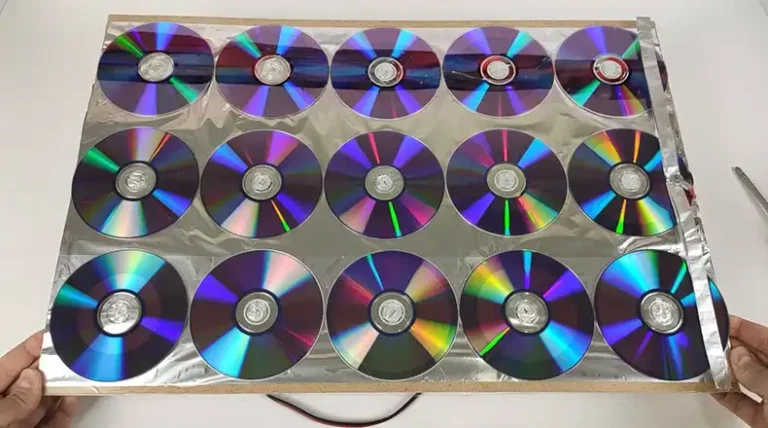

![Can You Make a Solar Panel out of CDs? [Answerd]](https://www.itekenergy.com/wp-content/uploads/2024/04/Can-You-Make-a-Solar-Panel-out-of-CDs-768x428.webp)